Build a workbench in 2 years
by havoc
(This post has nothing to do with software, move along if you aren’t into woodworking…)
Here’s my somewhat different workbench design (based on Christopher Schwarz’s “Knockdown Nicholson” plans which became this article), thinking someone out there might be interested. Also it’s a lesson in how to make simple plans ten times more complicated — whether you’d like to avoid or imitate my example, I’ll leave to you.
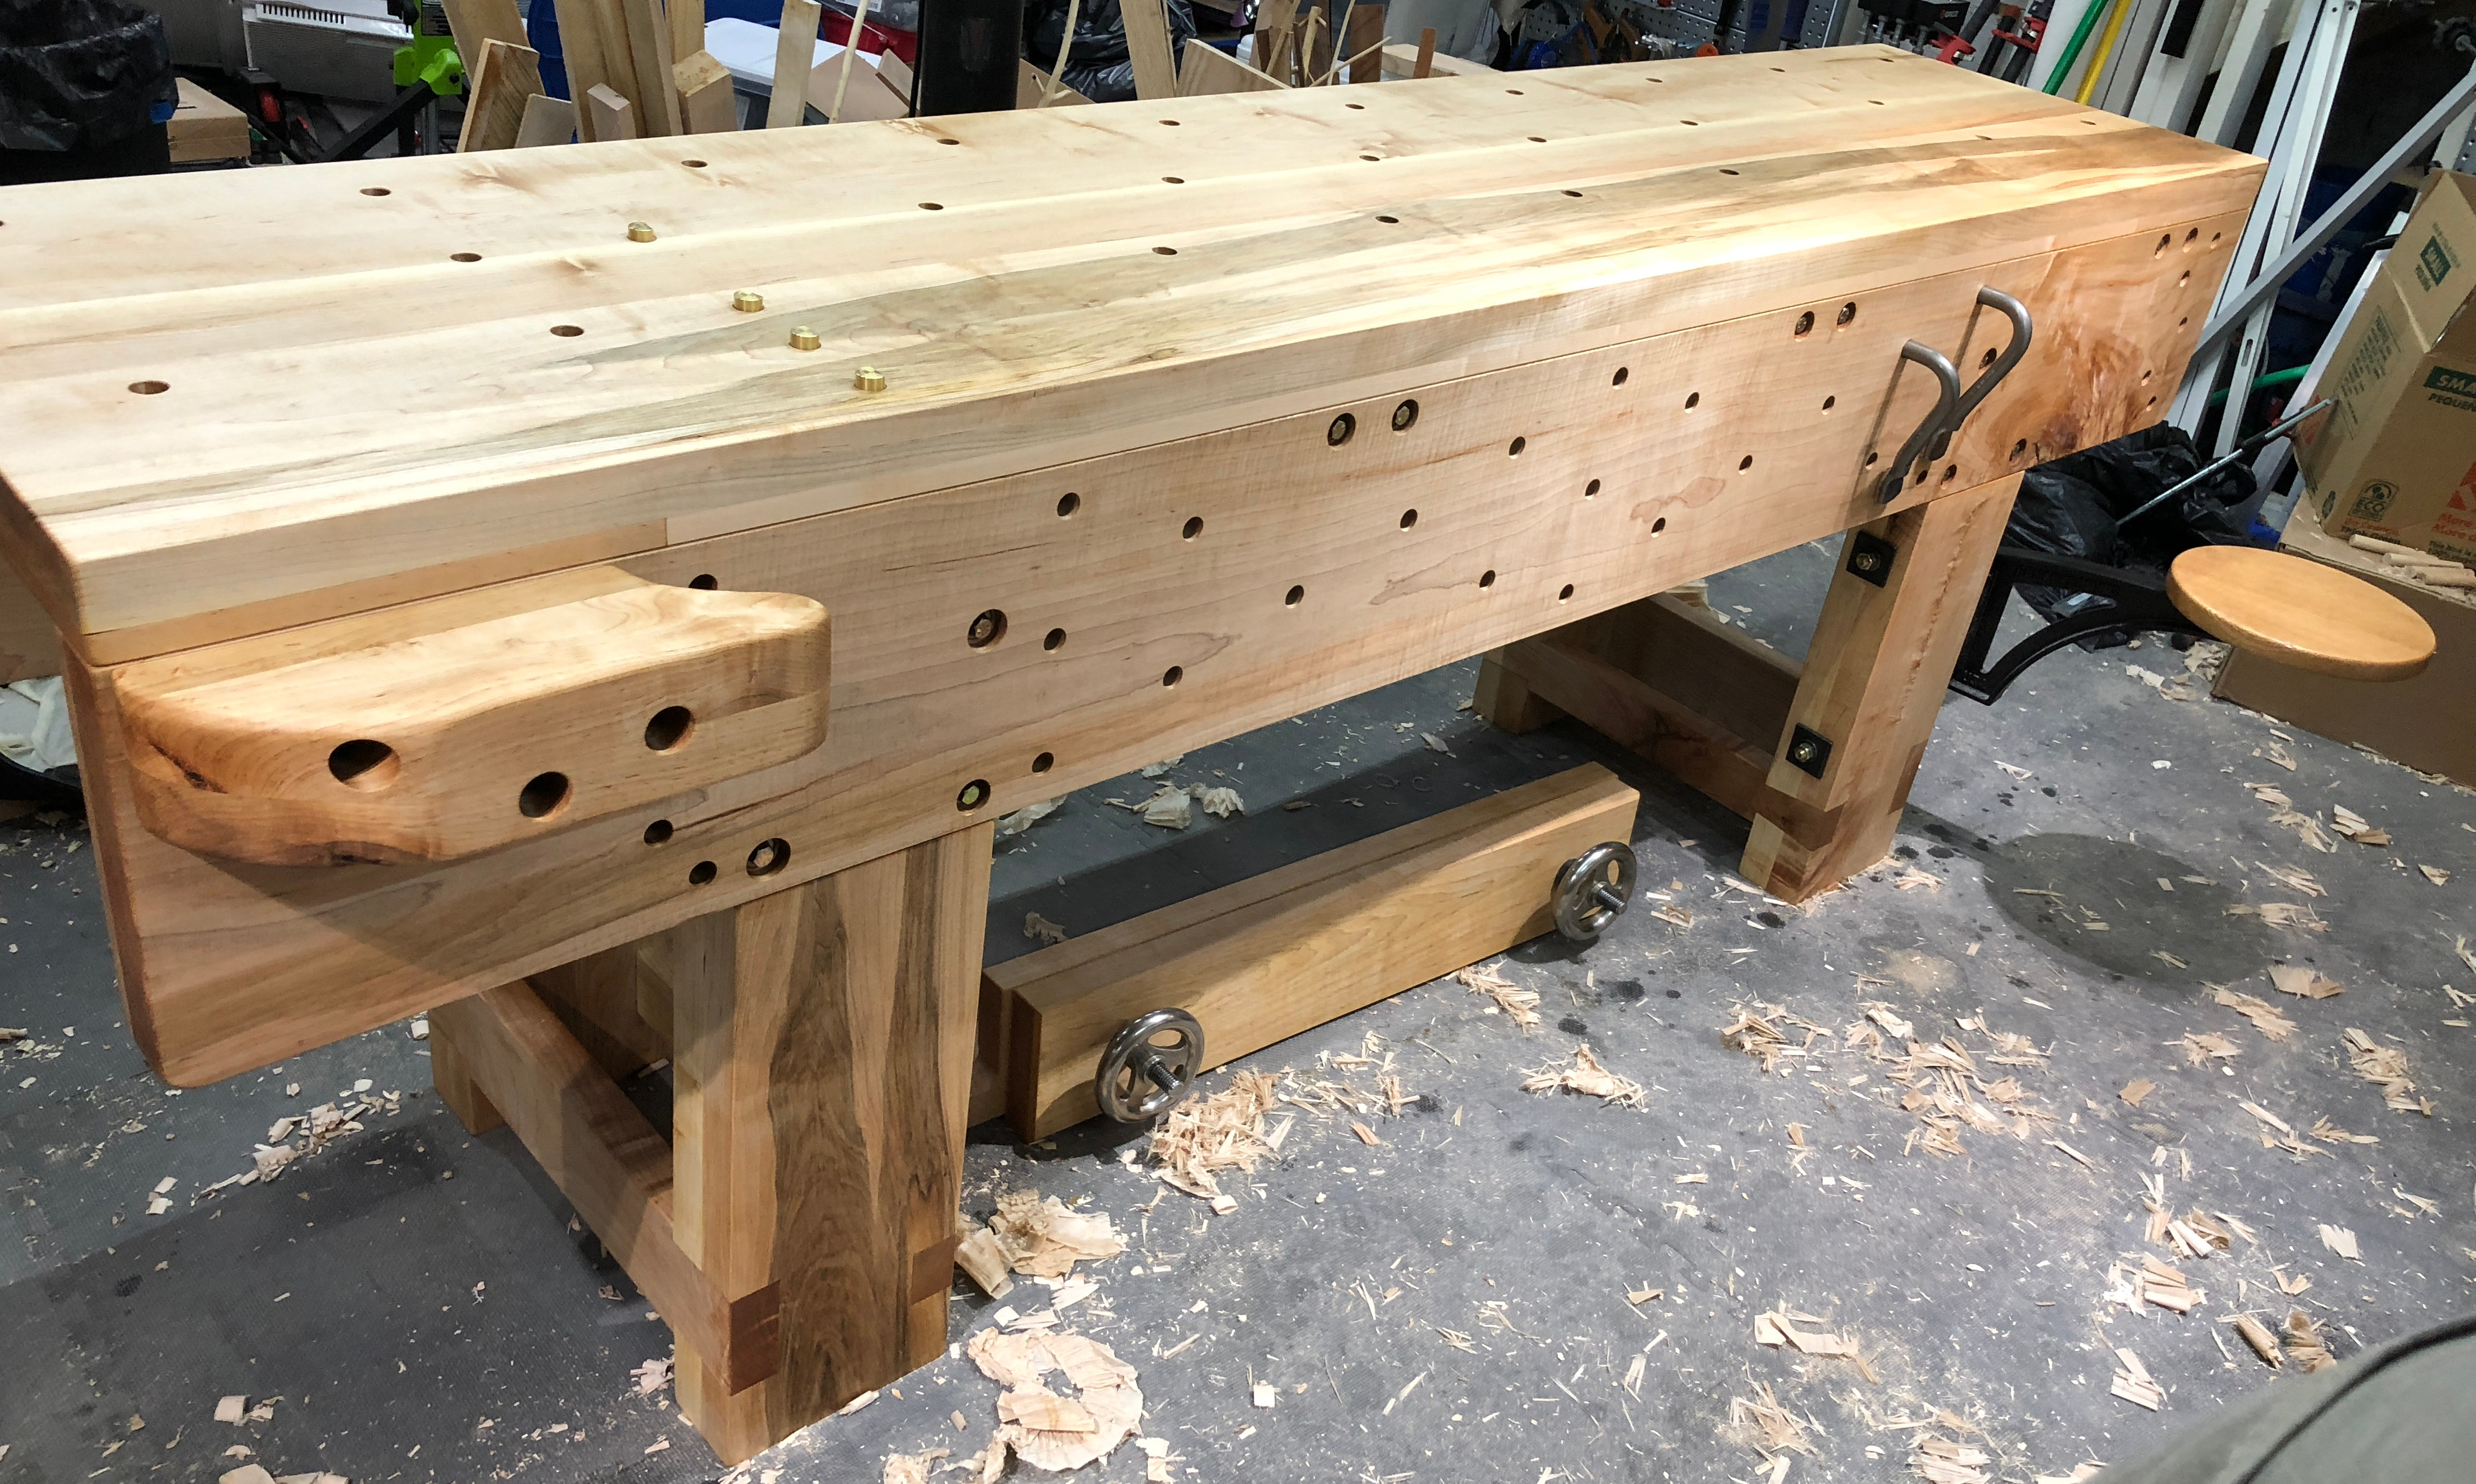
Here’s my finished workbench. (Someone actually skilled could build something prettier! But I think my bench will work well for decades if I’m fortunate.)
And here’s a tweet with the pile of wood I started with two and a half years ago:
~400 pounds of maple that I'm feeling a bit intimidated by. will be a new workbench, after a lot of work. pic.twitter.com/L6aiOs8DEB
— Havoc Pennington (@havocp) March 8, 2015
The Popular Woodworking article suggests “With $100 in lumber and two days, you can build this sturdy stowaway bench” to which I say, hold my beer. I can spend a lot more, and take way more time!
I have many excuses: my bench project is 2.5 years old, and my daughter is just over 2 years old. I started a new job and then left that to start a company. I probably had a few hours of shop time on average per week, and I worked on a lot of shop projects that weren’t the workbench itself.
Excuses only account for the calendar time though, not the shop time. This was closer to a 200-hour project for me than a two-day project.
How do you make a workbench project take ten times longer? (Other than “be an inexperienced hobbyist woodworker”?)
1. Use hardwood rather than southern yellow pine
I bought a pile of soft maple thinking it’d be a mostly-cosmetic choice. I’m very glad the finished bench is maple, but it slowed me down in several ways:
- the maple is heavy and the bench parts are hard to move with only one person, leading to several times where I had to wait for help to come over
- I had to mill all the boards from rough-sawn
- I decided maple meant more worry about wood movement, leading to design complexity
When I started this, I’d just finished a couple of sawbenches and some bookshelves made of pine, and I was sick of the stuff; it’s horrible. (Bias I will admit to: I have childhood memories of walking through stands of loblolly pine trees in 95-degree Georgia heat, getting ticks and sweating; loblolly pine offers no shade to speak of. Loblolly “forests” are the worst.)
2. Make it 8 feet long
Unfortunately, both jointer planes and powered jointers are designed for up to 6′ boards. 8′ boards not only have more surface area, they are also too long for the jointers. 8′ seems like it should be 33% more work than 6′, but it isn’t linear like that because the required skill level goes up.
I started this project to solve a too-short-bench problem. My old bench is based on these Ana White plans. I fixed that one up to be coplanar on the front, added a vise, and added a bunch of weight; it’s hideous but it does permit handwork with my modifications… as long as your boards are no longer than about 2.5 feet. The first time I tried to make a project with longer boards, I discovered I’d need a new bench.
My bench isn’t only longer than the original plans; everything is larger-scale. Most of the 8/4 lumber came out about 1-3/4″ rather than 1-1/2″ like construction lumber. The legs are 8″ wide rather than 5-1/2″ wide, and the top is 2-1/4″ thick all the way to the edge.
3. No power saws
I started to do this entirely with hand tools; after a while I caved and got a nice jointer/planer machine. Milling these boards completely by hand was beyond my hobbyist pay grade. That said, every part of the bench still required significant hand-planing, and I didn’t use power saws or routers. I’d guess I spent hours just cleaning up ends with a shooting board.
happy about success keeping this 8' rip cut straight and square the whole way. practice paying off 🙂 pic.twitter.com/s6BXuZbwFV
— Havoc Pennington (@havocp) March 26, 2016
If I built this bench again, I’d probably get a track saw, which would save a little sawing time and a LOT of cleanup-planing time.
4. Attach the top to the aprons rather than the leg assemblies
After I started the project, I realized that the original Knockdown Nicholson design doesn’t allow for much wood movement. Southern yellow pine doesn’t move too much, and I was worried maple would cause a problem. Maybe it would have, maybe not, I don’t know.
Rather than bolt the top to the leg assemblies, I used dowel nuts (the large 3/8-16 Veritas knockdown variety) to bolt “joists” between the aprons, and then lag-screwed the top to those joists.
There are advantages to the way I did it:
- No counterbores on top to be ugly and fill with shavings
- If the aprons move seasonally, the top should stay flat rather than being pushed up on the edges
- The top is ultra-solid: 2-1/4 inches thick, then also held flat and supported by the four joists and the aprons
- The joists are exactly the same length as the leg assemblies are wide, so they help hold the aprons flat
There are also disadvantages:
- Lots of extra time: making the joists, drilling the two intersecting holes for the knockdown fasteners, making the notches in the aprons for the joists
- Knockdown and assembly are harder (I intend to do this only when moving to a new house, so it’s OK, but it’d be an issue in a bench meant to regularly go places)
5. Build the leg assemblies with giant dovetails
Giant dovetails turn out to be much more time-consuming than regular dovetails. I started on this path because I didn’t have enough lumber to make the large screwed-on “plate” in the original plans.
I sawed most of the tails at least a little bit off square; squaring them up wasn’t easy at all, since they were wider than any chisel I owned. Similarly, the sockets were deeper than any router plane I had would go, with sides and bottom too large for my chisels. If you have timber-framing tools you might be able to do this more quickly than I did. This was another consequence of using the rough-sawn maple rather than construction lumber. Tools tend to top out at 1-1/2″ widths and depths, while the maple was more like 1-3/4″.
6. Overkill the tolerances
With more skill, I’d have known how to cut more corners. Instead, I made things as perfect as I could make them. This was still far from perfect — I could point out flaws in the workbench for hours!
To build a bench really quickly I think you’d want to avoid milling or planing construction lumber at all. But gosh it’d have some huge gaps. (My old Ana-White-style workbench is like this, because I owned neither plane nor planer… I pulled everything square with clamps, then Kreg-screwed it in place.)
7. Build a workbench without a workbench
While building a workbench, I often thought “this sure would be easier if I had a workbench.”
Planing boards on sawbenches sucks. Hello back pain! My old workbench is only 3′ wide, so it wasn’t an option (that’s why I built the new bench in the first place). It’d almost be worth building a terrible-but-full-size Kreg-screwed temporary bench, purely to build the final bench on, and then burning the temporary bench. Or perhaps some sort of bench-height sawhorses-and-plywood contraption.
What went well
The bench works very well — everything that made it take more time, had at least some payoff. I’m glad I have an 8′ maple bench instead of a 6′ pine bench. I’m glad it’s as good as I knew how to make it. The obnoxious-to-build joists made the top prettier and flatter, and the giant dovetails made the leg assemblies rock solid.
It breaks down into 5 parts, just like Christopher Schwarz’s original, and the McMaster-Carr mounting plates work great.
I love the Benchcrafted swing-away seat, it gives me somewhere to sit down that takes up zero floor space when not in use. (Of course I overkilled attaching it, with a bolt all the way through the bench leg, and thick square washers.)
Lessons learned
Ordering a workbench from Plate 11 or Lie-Nielsen makes total sense and their prices are a bargain!
If you do build something, consider sticking to the simple plan.
And I’m now a whole lot better at planing, sawing, drilling, sharpening, and all sorts of other skills than I was when I started. The next project I make might go a little bit faster.